In this tutorial, we will learn about Installing Nginx on Slave from Ansible Master and we will also cover the following steps through which we can install Nginx using the Ansible Master.
We are taking the two machines, In one machine we have configure the Ansible Master(Server) and on another machine we have only make the ssh connections inside the hosts file for that Slave IP.
Installing Nginx on Slave from Ansible Master
In the below output we are verifying the Ansible is installed into the system or not and to verify this we have use the below command:
ansible --version
In the below output we are verifying that Ansible server has made the connection with the host machine or not and to verify this we have use the below command:
ansible 192.168.64.4 -m pingTo Install or configure the Ansible on AWS Read: Installing Ansible Using AWS

Once the connection is established we can move ahead to install the Nginx inside the Slave machine and to proceed further we need to follow the following Ansible Playbook with help of that we would be able to install the Nginx inside the required host machine.
In the Ansible Master Machine we have already dry-run the following configuration or we can say we have write the following playbook to run the Install the Nginx inside the Slave Machine.
ansible-playbook filename.yml- hosts: "{{ host_name }}"
become: yes
tasks:
- name: "apt-get update"
apt:
update_cache: yes
cache_valid_time: 3600
- name: "install nginx"
apt:
name: ['nginx']
state: latest
- name: "create www directory"
file:
path: /var/www/nginx
state: directory
mode: '0775'
owner: "{{ ansible_user }}"
group: "{{ ansible_user }}"
Github Link
We can also check the different project codes at pythontpoint Github page to do this you guys can look for us with the following github Username.
Github User Name: PythonT-Point
After running the above playbook we succeed to install the Nginx inside the Salve Machine To verify we can use the below command weather it is installed into the system or not.

To Verify that our Nginx is also running we can run our IP or the host into the browser and we can see our page is also hosted with the help of the Nginx.
To Get the above Output inside the Slave machine we need to follow the below Steps:
- sudo systemctl start nginx
- sudo systemctl status nginx

We can also run the below command to check the version of Nginx, run:
- sudo dpkg -l nginx

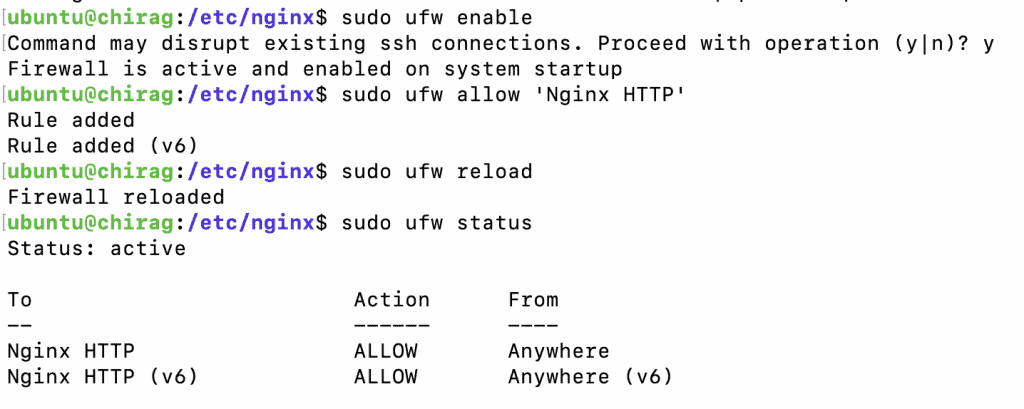
Now we have Nginx installed and running as expected inside the slave machine, a few settings are required for Nginx to be accessed via a web browser. If we are running the UFW firewall, then we need to allow the Nginx application profile.
There are 3 Nginx profiles associated with ufw firewall.
- Nginx Full – This opens both port 80 & 443 (For SSL / TLS encryption).
- Nginx HTTP – This open only port 80 ( For unencrypted web traffic).
- Nginx HTTPS – Opens only port 443 (For SSL / TLS encryption).
Commands:
- sudo ufw enable
- sudo ufw allow ‘Nginx HTTP’
- sudo ufw reload
- sudo ufw status

Now After the above Configuration we are now Testing & Configuring Nginx Server Block on Ubuntu 20.04 to do this we need to follow the below steps.
To create a server block file, First, we need to create a directory for or domain as shown.
sudo mkdir -p /var/www/pythonTpoint/htmlWith the below command we are assigning the ownership to the new directory using the $USER variable.
sudo chown -R $USER:$USER /var/www/pythonTpoint/htmlWe also need to ensure that we also assign directory permissions accordingly allowing the owner to have all the permissions (read, write and execute) and granting other parties only read and execute permissions.
sudo chmod -R 755 /var/www/pythonTpoint/Now we need to create an index.html a file that will contain the web content of the domain.
sudo vim /var/www/pythonTpoint/html/index.htmlInside the editor we can just copy paste the below Html code for the testing or learning purpose.
<html>
    <head>
        <title>Welcome to Pythontpoint</title>
    </head>
    <body>
        <h1>Bravo! Pythontpoint server block is working as expected!</h1>
    </body>
</html>
Now after the above steps we need to configure the Nginx webserver and to serve that we need to write the following Nginx Configuration.
sudo vim /etc/nginx/sites-available/pythonTpointserver {
listen 80;
listen [::]:80;
root /var/www/pythonTpoint/html;
index index.html index.htm index.nginx-debian.html;
server_name pythonTpoint 192.168.64.4;
location / {
try_files $uri $uri/ =404;
}
}
Now we need to enable the server block from the sites-enabled directory through which it reads the configuration and startup.
sudo ln -s /etc/nginx/sites-available/pythonTpoint /etc/nginx/sites-enabled/Now after all the steps we need to restart the Nginx server using the below command.
sudo systemctl restart nginxTo verify the Nginx configuration syntax is ok we need to run the below command.
sudo nginx -t
After all the Configuration we can verify the output by entering the IP address or the domain name to the web-browser.

Do follow the following tutorials also:

Comments are closed.