In this tutorial, we will learn How to create Tkinter Animation in Python Tkinter and we will also cover different examples related to Tkinter Animation. And, we will cover these topics.
- Python Tkinter Animation
- Python Tkinter Loading Animation
- Python Tkinter timer Animation
- Python Tkinter Simple Animation
- Python Tkinter Button Animation
Python Tkinter Animation
Tkinter is a graphical user interface or a GUI Programming tool. We can make different animations with the help of this tool.
As we know animation is used to appear as a moving image or change the position of the image where it is used to create an illusion of the moment of an object.
Code:
In the following code, we will import the Tkinter library from which we can make an animation of the object.
- ball_start_xposition = 50 is the starting x position of the ball.
- ball_start_yposition = 50 is the starting y position of the ball.
- win.title(“Pythontpoint”) is used to give the title to the widow.
- win.geometry(f'{window_width}x{window_height}’) is used to give the geometry to the window.
- can.configure(bg=”cyan”) is used configure the background color.
- can.create_oval is used to make the oval-shaped ball.
from tkinter import *
import tkinter
import time


window_width=600

window_height=400

ball_start_xposition = 50

ball_start_yposition = 50

ball_radius = 30

ball_min_movement = 5

refresh_sec = 0.01


def create_animation_window():
  win = tkinter.Tk()
  win.title("Pythontpoint")

  win.geometry(f'{window_width}x{window_height}')
  return win


def create_animation_canvas(win):
  can = tkinter.Canvas(win)
  can.configure(bg="cyan")
  can.pack(fill="both", expand=True)
  return can


def animate_ball(win, can,xinc,yinc):
  ball = can.create_oval(ball_start_xposition-ball_radius,
            ball_start_yposition-ball_radius,
            ball_start_xposition+ball_radius,
            ball_start_yposition+ball_radius,
            fill="blue", outline="Black", width=4)
  while True:
    can.move(ball,xinc,yinc)
    win.update()
    time.sleep(refresh_sec)
    ball_pos = can.coords(ball)
    al,bl,ar,br = ball_pos
    if al < abs(xinc) or ar > window_width-abs(xinc):
      xinc = -xinc
    if bl < abs(yinc) or br > window_height-abs(yinc):
      yinc = -yinc


Animation_Window = create_animation_window()
Animation_canvas = create_animation_canvas(Animation_Window)
animate_ball(Animation_Window,Animation_canvas, ball_min_movement, ball_min_movement)
Output:
After running the above code we get the following output in which we can see that the ball is moving from one position to the other position.

Read: Python Graphical User Interface(Python Tkinter)
Python Tkinter Loading Animation
In this part of the python tkinter animation tutorial, we are learning about the Tkinter loading animation. In which we can see the processing of any page or loading of any data through the internet.
Code:
In this code, we will import the Tkinter library from which we can create a loading animation and see how our page loads.
- wd.title(“Pythontpoint”) is used to give the title to the window.
- progress_bar=Progressbar(wd,orient=HORIZONTAL,length=250,mode=’determinate’) is used to create the progress bar which show the loading animation.
- Button(wd,text=’Run’,command=slidebar).pack(pady=10) is used to create a run button on the screen.
from tkinter import *
from tkinter.ttk import *
import tkinter
wd=Tk()
wd.title("Pythontpoint")

progress_bar=Progressbar(wd,orient=HORIZONTAL,length=250,mode='determinate')

def slidebar():
    import time
    progress_bar['value']=20
    wd.update_idletasks()
    time.sleep(1)
    progress_bar['value']=50
    wd.update_idletasks()
    time.sleep(1)
    progress_bar['value']=80
    wd.update_idletasks()
    time.sleep(1)
    progress_bar['value']=100

progress_bar.pack()
Button(wd,text='Run',command=slidebar).pack(pady=10)
wd.mainloop()
Output:
After running the above code we get the following output in which we can see that the progress bar is shown in which the loading part is shown.

Python Tkinter timer Animation
As we know the timer is used to give the alert to the person for completing their task on time. We can use the timer in our daily life such as an alarm clock we can set the alarm in the clock and the alarm is work as a timer.
Code:
In the following code, we will import the Tkinter library and also import time from which we can set the time in the timer.
- wd = Tk() is used for creating the Tk window.
- wd.geometry(“300×250”) is used to give the geometry to the window.
- wd.title(“Pythontpoint”) is used to give the title to the window.
- hourentry= Entry(wd, width=3, font=(“Arial”,18,””),textvariable=hour) is used to take the input from the user in the entry.
- messagebox.showinfo(“Time Countdown”, “Time’s up “) is used to show the pop up message on the screen.
- button = Button(wd, text=’Set Time Countdown’, bd=’5′,command= submit) is used create button on the screen.
from tkinter import *
from tkinter import messagebox
import time

wd = Tk()

wd.geometry("300x250")
wd.title("Pythontpoint")

hour=StringVar()
minute=StringVar()
second=StringVar()

hour.set("00")
minute.set("00")
second.set("00")

hourentry= Entry(wd, width=3, font=("Arial",18,""),
                 textvariable=hour)
hourentry.place(x=80,y=20)

minuteentry= Entry(wd, width=3, font=("Arial",18,""),
                   textvariable=minute)
minuteentry.place(x=130,y=20)

secondentry= Entry(wd, width=3, font=("Arial",18,""),
                   textvariable=second)
secondentry.place(x=180,y=20)


def submit():
    try:

        temp = int(hour.get())*3600 + int(minute.get())*60 + int(second.get())
    except:
        print("Please input the right value")
    while temp >-1:


        hours=0
        if mins >60:

            hours, mins = divmod(mins, 60)

        hour.set("{0:2d}".format(hours))
        minute.set("{0:2d}".format(mins))
        second.set("{0:2d}".format(secs))

        wd.update()
        time.sleep(1)

        if (temp == 0):
            messagebox.showinfo("Time Countdown", "Time's up ")

        temp -= 1

button = Button(wd, text='Set Time Countdown', bd='5',
             command= submit)
button.place(x = 70,y = 120)

wd.mainloop()
Output:
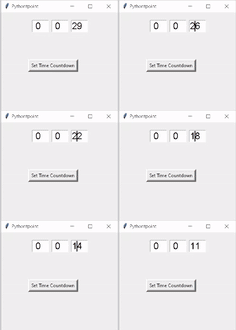
After running the above code we get the following output in which we can see that the user can set the time accordingly and the timer starts running.

Python Tkinter Simple Animation
In this part of the python tkinter animation tutorial, we will learn how to make a simple animation in Python Tkinter. Here we are creating a simple animation we place a button on the screen after clicking on the button the color of the screen changed every time.
Code:
In the following code, we will import the Tkinter module from which we can create a simple animation on the screen.
- wd.configure(background=random.choice([“cyan”, “purple” , “blue” , “yellow”])) is used to configure the background color of the screen.
- wd.title(“Pythontpoint”) is used to give the title to the window.
- button=Button(wd,text=’Click Me’,command = gen_color).pack() is used to placed the button on the screen.
from tkinter import *
import random

def gen_color():
    wd.configure(background=random.choice(["cyan", "purple" , "blue" , "yellow"]))

wd =Tk()
wd.title("Pythontpoint")
wd.geometry('500x500')

button=Button(wd,text='Click Me',command = gen_color).pack()
wd.mainloop()
Output:
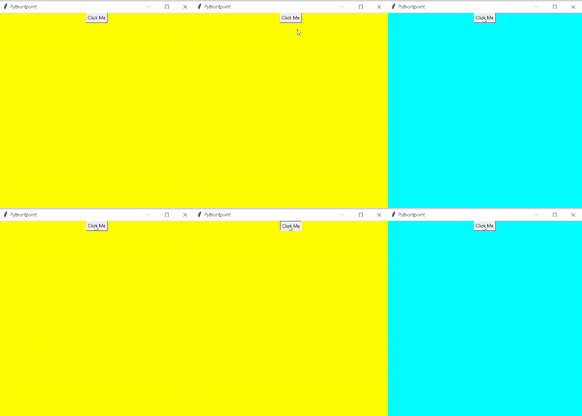
After running the above code we get the following output in which we can see that on clicking on the button our screen color is changed.

Python Tkinter Button Animation
In this part of the python tkinter animation tutorial, we will learn how to create a button animation in Python Tkinter. The button is a very useful action through which we can perform very different events.
- In this example, we are performing a button animation using the python Tkinter library. We can even customize the button according to our use.
- Like we are using a button to enable and disable or even we can use the button to submit any action where it takes us to a different event as required by the user.
Code:
In the following code, we will import the tkinter library from tkinter import *, import tkinter from which we can create a button animation.
- wd.title(“Pythontpoint”) is used to give the title to the window.
- a=Button(wd, text=”button”) is used to add the button on the screen.
from tkinter import *
import tkinter
wd = Tk()
wd.title("Pythontpoint")

def convert():
    if(a['state']==NORMAL):
        a["state"] = DISABLED
        a1["text"]="enable"
    elif (a['state']==DISABLED):
        a["state"]=NORMAL
        a1["text"]="disable"


a=Button(wd, text="button")
a.config(height = 8, width = 9)
a.grid(row=4, column=4)
a1 = Button(text="disable", command=convert)
a1.grid(row=4,column=5)
wd.mainloop()
Output:
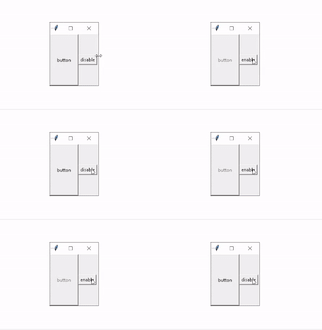
After running the above code we get the following output in which we can see a button is performing its action to enable and disable the event that we want to perform. This enable and disable button is working the same as the on-off button.

So, in this tutorial, we discussed Python Tkinter Animation and we have also covered different examples related to its implementation. Here is the list of examples that we have covered.
- Python Tkinter Animation
- Python Tkinter Loading Animation
- Python Tkinter timer Animation
- Python Tkinter Simple Animation
- Python Tkinter Button Animation
