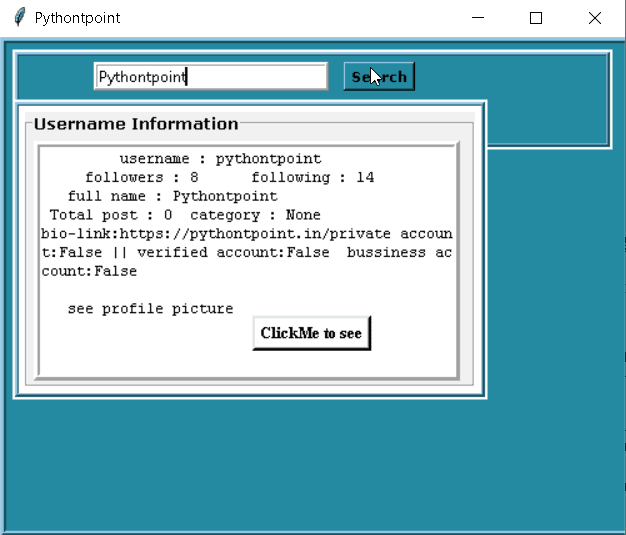
In this Python Tkinter tutorial, we will learn about how Instagram works while we enter the user name of the user in the entry box to find the user details we can also see the display picture of the user by simply clicking on the button which shows the display picture.
Block of code:
In this Python Tkinter Instagram User block of code, we will generate a workspace where the user can enter the name which they want to search.
- wd.title(“Pythontpoint”) is used to give the title to the screen.
- wd.geometry(‘500×400’) is used to give the width and height to the screen.
wd = tk.Tk()
wd.title("Pythontpoint")
wd.geometry('500x400')
Block of code:
In this Python Tkinter Instagram User block code, we can define the function in which we can give the labels, URL.
- dataofinsta = requests.get(url).json() is used to get the data from the user.
- print(dataofinsta) is used to print the data on the screen.
def search():
        user_name = user.get()
        url = f"https://www.instagram.com/{user_name}/?__a=1"

        dataofinsta = requests.get(url).json()
        print(dataofinsta)
Block of code:
In this Python Tkinter Instagram user block of code, we define a function in which the user can see that profile pic of the other user that they mention in the entry field of username.
d1 = dataofinsta[‘graphql’][‘user’][‘profile_pic_url’] is used see the Profile pic on the screen after click on the button.
def pic():
                import webbrowser
                d1 = dataofinsta['graphql']['user']['profile_pic_url']
                webbrowser.open(d1)
Read: Restaurant Management System Project using Python Tkinter
Block of code:
In this Python Tkinter Instagram User block of code, we will create an entry dialogue box where the user can enter the Instagram username.
After entering the user name in the dialogue box the detail of the id will be shown on the screen.
 if details.get(1.0,END) != "":
                details.delete(1.0,END)
                details.insert(1.0,f"\t username : {dataofinsta['graphql']['user']['username']} \n     followers : {dataofinsta['graphql']['user']['edge_followed_by']['count']}      following : {dataofinsta['graphql']['user']['edge_follow']['count']} \n   full name : {dataofinsta['graphql']['user']['full_name']} \n Total post : {dataofinsta['graphql']['user']['edge_owner_to_timeline_media']['count']}  category : {dataofinsta['graphql']['user']['category_enum']} \nbio-link:{dataofinsta['graphql']['user']['external_url']}private account:{dataofinsta['graphql']['user']['is_private']} || verified account:{dataofinsta['graphql']['user']['is_verified']}  bussiness account:{dataofinsta['graphql']['user']['is_business_account']}  \n \n   see profile picture" )
Block of code:
In this Python Tkinter Instagram user block of code, we placed a button from which action is done.
After clicking on the button command, the user profile pic is open and shown on the screen.
Button(innerframe1,text="ClickMe to see",relief=RAISED,borderwidth=3,font=('Times New Roman',10,'bold'),bg='white',fg="black",command=pic).place(x=180,y=145)
Github Link
Check this code in Repository from Github and you can also fork this code.
Github User Name: PythonT-Point
Block of code:
In this Python Tkinter Instagram user block of code, we will create a frame where all the detail of the user is shown.
- frame1 = Frame(wd,width=600,height=400,relief=RIDGE,borderwidth=5,bg=’#248aa2′) frame1.place(x=0,y=0) is used to create a frame.
- LabelFrame(frame1,width=480,height=80,relief=RIDGE,borderwidth=3,bg=’#248aa2′,highlightbackground=”white”, highlightcolor=”white”, highlightthickness=2) is used to give the label to the frame.
frame1 = Frame(wd,width=600,height=400,relief=RIDGE,borderwidth=5,bg='#248aa2')
frame1.place(x=0,y=0)

LabelFrame(frame1,width=480,height=80,relief=RIDGE,borderwidth=3,bg='#248aa2',highlightbackground="white", highlightcolor="white", highlightthickness=2)
innerframe.place(x=5,y=5)
Block of code:
In this Python Tkinter Instagram user block of code, we create an entry box where the user can enter the input.
- user = Entry(frame1,width=30,relief=RIDGE,borderwidth=3) user.place(x=70,y=15) is used to take the input from the user.
- search=Button(frame1,text=”Search”,relief=RAISED,borderwidth=2,font(‘verdana’,8,’bold’),bg=’#248aa2′,fg=”black”,command=search) is used to search the input that enter by the user.
user = Entry(frame1,width=30,relief=RIDGE,borderwidth=3)
user.place(x=70,y=15)

search = Button(frame1,text="Search",relief=RAISED,borderwidth=2,font=('verdana',8,'bold'),bg='#248aa2',fg="black",command=search)
search.place(x=270,y=15)
Block of code:
In this Python Tkinter Instagram user block of code, we see the detail of the user that is mentioned in the entry box are shown on the screen.
details=Text(innerframe1,height=12,width=47,relief=RIDGE,borderwidth=5,highlightbackground=”white”, highlightcolor=”white”,font=(‘courier’,9,”)) details.place(x=5,y=5) is used to give the proper information of the user.
details = Text(innerframe1,height=12,width=47,relief=RIDGE,borderwidth=5,highlightbackground="white", highlightcolor="white",font=('courier',9,''))
details.place(x=5,y=5)
Code:
In this code, we will get the complete description of the Instagram user by simply typing the user name in the entry box.
from tkinter import *
import tkinter as tk
import requests

wd = tk.Tk()
wd.title("Pythontpoint")
wd.geometry('500x400')


def search():
        user_name = user.get()
        url = f"https://www.instagram.com/{user_name}/?__a=1"

        dataofinsta = requests.get(url).json()
        print(dataofinsta)


        def pic():
                import webbrowser
                d1 = dataofinsta['graphql']['user']['profile_pic_url']
                webbrowser.open(d1)


        if details.get(1.0,END) != "":
                details.delete(1.0,END)
                details.insert(1.0,f"\t username : {dataofinsta['graphql']['user']['username']} \n     followers : {dataofinsta['graphql']['user']['edge_followed_by']['count']}      following : {dataofinsta['graphql']['user']['edge_follow']['count']} \n   full name : {dataofinsta['graphql']['user']['full_name']} \n Total post : {dataofinsta['graphql']['user']['edge_owner_to_timeline_media']['count']}  category : {dataofinsta['graphql']['user']['category_enum']} \nbio-link:{dataofinsta['graphql']['user']['external_url']}private account:{dataofinsta['graphql']['user']['is_private']} || verified account:{dataofinsta['graphql']['user']['is_verified']}  bussiness account:{dataofinsta['graphql']['user']['is_business_account']}  \n \n   see profile picture" )


                Button(innerframe1,text="ClickMe to see",relief=RAISED,borderwidth=3,font=('Times New Roman',10,'bold'),bg='white',fg="black",command=pic).place(x=180,y=145)


frame1 = Frame(wd,width=600,height=400,relief=RIDGE,borderwidth=5,bg='#248aa2')
frame1.place(x=0,y=0)

innerframe = LabelFrame(frame1,width=480,height=80,relief=RIDGE,borderwidth=3,bg='#248aa2',highlightbackground="white", highlightcolor="white", highlightthickness=2)
innerframe.place(x=5,y=5)


user = Entry(frame1,width=30,relief=RIDGE,borderwidth=3)
user.place(x=70,y=15)

search = Button(frame1,text="Search",relief=RAISED,borderwidth=2,font=('verdana',8,'bold'),bg='#248aa2',fg="black",command=search)
search.place(x=270,y=15)


innerframe = LabelFrame(frame1,width=380,height=240,relief=RIDGE,borderwidth=3,bg='#248aa2',highlightbackground="white", highlightcolor="white", highlightthickness=2)
innerframe.place(x=5,y=45)


innerframe1 = LabelFrame(innerframe,text="Username Information",width=370,height=230,highlightbackground="white", highlightcolor="white", highlightthickness=5,font=('verdana',10,'bold'))
innerframe1.place(x=0,y=0)


details = Text(innerframe1,height=12,width=47,relief=RIDGE,borderwidth=5,highlightbackground="white", highlightcolor="white",font=('courier',9,''))
details.place(x=5,y=5)

wd.mainloop()
Output:
After running the above code we get the following output in which we can see that the frame is created in which an entry box, search button, and the user information frame are shown on the screen.

In the following output, we can see that we enter the username after entering the username they press on the search button.
After pressing the search button the full detail of the user which we want to search are shown on the screen.

In the above output we can see at the bottom of the picture there is a Click Me button is shown after clicking on this button the profile pic of the user is shown on the screen as you can see in the below output.


1 thought on “Python Tkinter Instagram User Detail”
Comments are closed.